
Latest Gear Live Videos
Bleeding Edge TV 535: How to swap Apple Watch bands

Posted by Andru Edwards Categories: Accessories, Apple, Wearables, Features, Podcasts, Videocasts, Videos,
Apple offers a variety of watch bands for the Apple Watch, all with varying price points and fashion cues. That being the case, it wouldn't be out of the ordinary for someone to own more than one Apple Watch band, in order to switch up colors and materials to fit a certain look or occasion. In this episode, I show you how to change the Apple Watch bands quickly and easily - Apple has literally made it a snap. Here are the various Apple Watch bands that you can buy:
You can pick up the Apple Watch now from the Apple Store online.
Don't forget to subscribe to Gear Live's YouTube channel--also, we are giving away awesome perks for our Patreon backers - thanks for your support!
Click to continue reading Bleeding Edge TV 535: How to swap Apple Watch bands
Advertisement
Bleeding Edge TV 534: How to change & customize watch faces on the Apple watch
Posted by Andru Edwards Categories: Apple, Wearables, Features, Podcasts, Videocasts, Videos,
When Apple launched the Apple Watch, it shipped with 10 distinct watch faces that you can choose from. Even better, many of the Apple Watch faces also feature varying levels of customization, allowing you to add complications like the date, calendar appointments, fitness data, and more. In this episode, I show you how to change the watch face on your Apple Watch, as well as customize the faces to your specific liking!
You can pick up the Apple Watch now from the Apple Store online.
Don't forget to subscribe to Gear Live's YouTube channel--also, we are giving away awesome perks for our Patreon backers - thanks for your support!
Apple posts “Do Not Disturb TV ad amidst New Year DND bug

Posted by Jason Diaz Categories: Apple, Smartphones, Software,

Apple posted a new TV ad showcasing a feature in iOS 6 dubbed "Do Not Disturb" on New Year's day. Coincidently, users have reported that the feature didn't work as it should on the on the 1st. Some have speculated that it was a bug similar to the Daylight Savings glitch that plagued some users during the time change a few years back, albeit this issue being a year change. Apple made a statement today on its support page regarding the problem, suggesting that users manually set it until said date as a temporary remedy. The timing is perfect, sarcasm! Catch the video after the click.
Click to continue reading Apple posts “Do Not Disturb TV ad amidst New Year DND bug

Ask Andru: How do I stop iPhoto from opening when I plug in my iPhone?
Posted by Andru Edwards Categories: Apple, Smartphones, Features, PC / Laptop, Software,
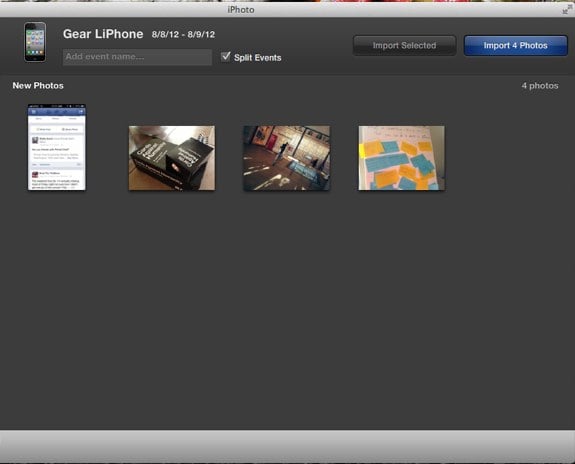
Apple tries to make it easy to use all of its products together harmoniously, but there are times where it might get in the way. Today we received a question that asks how to stop iPhoto from opening automatically whenever an iPhone is plugged in, and that's exactly the kind of synergy that can get annoying when all you want to do is charge up your device while you work. Luckily, I've got your answer. There are a couple of different ways to do this, and they look similar at the surface level, but actually serve two different purposes. Let's explore them.
Question: How do I stop iPhoto from automatically opening whenever I plug in my iPhone? It's annoying!
Click to continue reading Ask Andru: How do I stop iPhoto from opening when I plug in my iPhone?
Ask Andru: How do I prepare my Mac for Mountain Lion?
Posted by Andru Edwards Categories: Apple, Features, PC / Laptop, Software,

Apple is set to release it's next major operating system update, known os OS X Mountain Lion, later this month. In this edition of Ask Andru, Tracy writes in and asks if there is anything she should do to prepare her Mac computers for the Mountain Lion installation. I share some tips on what we can all do to ensure a smooth upgrade experience to Mac OS 10.8.
Question: I hear that Apple will be releasing a new version of OS X shortly. Is there anything I need to do in order to prepare for it to ensure that I can run it? Will it be expensive?
You're correct! Apple announced OS X 10.8 Mountain Lion just five months ago, and it will be available in under two weeks. Mountain Lion will sell exclusively on the Mac App Store for $19.99 (so, not expensive at all!) and will include some nice features, including AirPlay Mirroring from your Mac, tighter iCloud integration, Twitter and Facebook built-in at the system level, Reminders, Notes, Game Center, a new Messages app that will let you send and receive iMessages from the Mac, iPhone, iPod touch, and iPad. In total, there are over 200 new features that Apple is introducing in Mountain Lion.
Click to continue reading Ask Andru: How do I prepare my Mac for Mountain Lion?
How to bring Siri to your Mac
Posted by Andru Edwards Categories: Apple, Software,

Siri has been relegated to the confines of the iPhone 4S for the past six months, while many a new iPad owner and Mountain Lion beta tester have wondered what's taking Apple so long to release the feature from beta. For those of you running the latest version of OS X, Reddit user Moosehadley figured out that you can inject Siri's female voice right into OS X Lion (we've confirmed that this works for Mountain Lion as well.) All you need to do is go into System Preferences > Speech > Text to Speech. Use the System Voice pulldown, and choose Customize. From the list, select "Samantha" and let it install. This is the same voice used for Siri, and should hold you over until her full functionality makes it to the Mac.
How to fix a frozen Finder, Dock, Menubar on your Mac
Posted by Andru Edwards Categories: Apple, Editorial, Features, PC / Laptop, Software,
A few minutes ago, my dock crashed in OS X. Everything else was fine, but I couldn't launch anything or switch between apps. Usually, people would reboot in this situation, but there's a much faster and easier way to fix a frozen dock, which meant I could continue working without having to worry about saving and restarting everything. In fact, you can fix a stuck Finder, Menubar, and Spaces as well. All you need to do is launch Terminal, and type in a simple command for each. Here's what you do after launching terminal in these situations - these are all case-sensitive:
If the Finder crashes:
killall -KILL Finder
(Or, you can right-click the Finder and select Relaunch)
If the Dock crashes and becomes unresponsive:
killall -KILL Dock
If Spaces crashes and you can't swap between them:
killall -KILL Dock
If the Menubar crashes and can't be clicked (beachball):
killall -KILL SystemUIServer
There you go! Easy ways to quickly fix system issues that might crop up on your Mac.
Ask Andru: How can I make my iPad louder?
In today's Ask Andru column, we get a question about an issue with the iPad that we've actually experienced ourselves for years. Ever since the release of the original iPad, it's been painfully obvious that the speaker on the Apple tablet isn't exactly up to snuff. It's fine if you're somewhere quiet, but go somewhere that has any ambient noise, and all of a sudden it's a challenge to enjoy any audio-based entertainment. So, on to the submitted question:
I love my new iPad, but I wish it were louder. It seems that everything about the new iPad is high-quality, with the exception of the speaker! Is there any way I can get more volume out of this thing?
I hear you! As I said earlier, the low volume issue has been around since the very first iPad. When the iPad 2 was released, the speaker grille was larger, and many assumed that this meant that the device would be louder. Unfortunately, despite the visual cue, the iPad 2 suffered from the same issue, and the new third-generation model (see our new iPad review) seems to have the exact same speaker as its predecessor. Luckily, there are a few things you can do to alleviate the frustration.
Click to continue reading Ask Andru: How can I make my iPad louder?
How to fix: Apps Installed on the iPhone could not be Determined
Posted by Andru Edwards Categories: Apple, Features, PC / Laptop, Software,
I've been putting up with an annoying iTunes error when trying to sync my iPhone 4S. The sync always fails, telling me that it's because "Apps installed on the iPhone could not be determined" - We figured there were others out there receiving the same message, so we wanted to share how we fixed it. The problem would always start with iTunes attempting to transfer apps from the iPhone that it says weren't in the iTunes library - however, this is incorrect, as each time it wanted to transfer over all 153 apps from the iPhone. After the transfer started, the error would appear. Here are some things you can try if you're experiencing the same problem:
First, make sure you're running the latest version of iOS and iTunes. Restart your iPhone (or other iOS device) by holding down the home button and the sleep/wake button at the same time until the Apple logo appears. While it's rebooting, quit and restart iTunes. For some, this will usually fix the problem, but for us it didn't.
The next step is to reboot your computer. When it's back up, launch iTunes and update all apps in iTunes and do the same on your iPhone. Once this is done and both devices have the latest version of the apps that you own, connect your iPhone (and be sure you're using a first-party Apple sync cable) and attempt to sync. This will fix the issue if your iPhone and iTunes each have different versions of an app that might be corrupt. However, in our case, things were still failing. In this case, I had to watch the iTunes status during the sync and noticed that the error came up when it attempted to sync the Price is Right app. I manually deleted it from my phone, synced again, and it worked just fine.
Hope this saves some of you guys out there some frustration!
Bleeding Edge TV 410: Apple iMac RAM upgrade tutorial
Posted by Andru Edwards Categories: Full Episodes, Gizmatic, Apple, Features, PC / Laptop, Podcasts, Videocasts, Videos,
In this episode we teach you how to install RAM in your Apple iMac. The model we are using is the 27-inch 2011 iMac, which has a quad-core processor and supports up to 4 RAM chips. Installing your own RAM is an easy way to save a lot of money, rather than paying for the extra RAM with the iMac. In our case, we install 16 GB of RAM in under 5 minutes, saving ourselves over $500 in the process - and it is so easy that anyone can do it, and all you need is a Philips screwdriver and a little courage.
As you see in the video, all you need to do is unscrew the RAM cover, and pull on the tabs to remove the RAM that ships with the iMac. From there, you simple insert the new RAM, push it in until it clicks, and reinstall the cover. Turn it on, and go into About This Mac to get a look at the amount of RAM that your system is recognizing. If it is showing the amount you installed, you are done! Even better, you just saved yourself a bunch of cash as well. You can pick up the RAM at Amazon for a great price, and of course, the iMac is there as well.
Big thank you to MozyPro and JackThreads for sponsoring the show - be sure to check them out! MozyPro provides simple, automatic, and secure data backup. As for JackThreads, we've got exclusive invite codes that give you $5 to use towards anything you'd like on the site.


Advertisement
© Gear Live Inc. {year} – User-posted content, unless source is quoted, is licensed under a Creative Commons Public Domain License. Gear Live graphics, logos, designs, page headers, button icons, videos, articles, blogs, forums, scripts and other service names are the trademarks of Gear Live Inc.